

今天小编就带大家来共同学习如何在微信小程序中实现问答机器人? 希望可以帮助到有需要的小伙伴哦,下面就是详细完整的操作步骤。
实例主要功能
风格类似聊天窗口
用户发送信息时,调用机器人接口返回回答信息
将所有信息记录到本地存储中
每次打开都显示最近的问答数据
当发送空信息时有相应提示
先看效果图
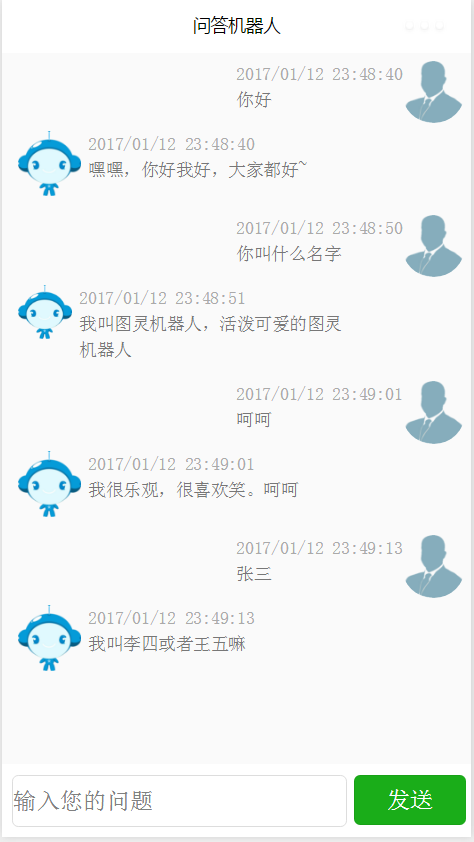
微信小程序 - 问答机器人
关键代码分析
提示信息
wx.showToast({
title: \'请输入您的问题\',
icon: \'loading\'
});
说明:icon可以接收loading、success(默认)存储数据到本地
setContent2Storage: function(data) {
wx.setStorage({
key: \'content\',
data: data,
success: function(res){
// success
//console.log("=====保存成功=====");
}
})
}
说明:数据存储是以键值对的形式存在,key表示键,data表示值,可以是字段串,也可以是对象从本地存储中取值
loadContent: function() {
var page = this;
wx.getStorage({
key: \'content\',
success: function(res){
// success
console.log(res);
page.setData({content:res.data});
}
})
}
说明:上面的setContent2Storeage和loadContent都是属于自己在本例中的封装,微信所封装的方法分别是wx.setStorage和wx.getStorage,通过键即可获取出数据,并将数据设置到page的data中,这样即可更新页面中的数据。
index.wxml
<view class="main-container">
<scroll-view class="content" scroll-y="true">
<import src="../templates/me-tpl"/>
<import src="../templates/robot-tpl"/>
<block wx:for="{{content}}" wx:key="item">
<template wx:if="{{item.isRobot}}" is="robot-tpl" data="{{item}}"/>
<template wx:if="{{!item.isRobot}}" is="me-tpl" data="{{item}}"/>
</block>
</scroll-view>
<view class="sender-container">
<view style="flex-grow:1">
<input placeholder="输入您的问题" value="{{q}}" bindinput="inputEvent"/>
</view>
<view>
<button type="primary" bindtap="queryAnswer">发送</button>
</view>
</view>
</view>
说明:在这个实例中增加使用了scroll-view可滚动的视图容器。详细说明可参考官方scroll-view,也使用了wx:if用于判断该使用哪个视图模板视图模板
<template name="me-tpl">
<view class="me">
<image src="../imgs/me.png"/>
<view>
<text class="date">{{item.date}}</text>
<text>{{item.text}}</text>
</view>
</view>
</template>
以上只是贴出了一些相对关键的代码,直接使用无法运行。
以上就是如何在微信小程序中实现问答机器人的全部内容了,大家都学会了吗?


")
")


语音转文字!新媒体翻译者都有哪些实时语音转文本工具?")


