Zabbix开源系统监控工具
3.4官方正式版- 软件大小:527.65KB
- 更新时间:2023-07-28
-
用户评分:

- 软件版本:3.4
- 软件语言:简体中文
- 系统类型:支持32/64位
- 软件授权:免费
- 下载次数:88次
- 杀毒检测:无插件360通过金山通过
- 运行系统:winall/win7/win10/win11
本地纯净下载
纯净官方版软件简介
 Zabbix开源系统监控工具官方版是一款非常实用的系统监视工具,该软件可以很好地帮助用户对电脑中软件的网络使用情况进行监控,其软件功能十分全面,支持强制关闭功能,让用户能够将占用大量宽带的软件关闭。有需要的的用户赶快下载体验吧。
功能介绍:
CPU负荷
内存使用
磁盘使用
网络状况
端口监视
日志监视
Zabbix开源系统监控工具软件特色
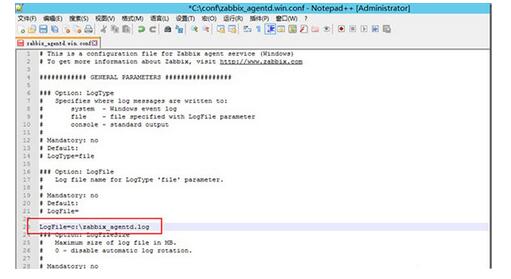
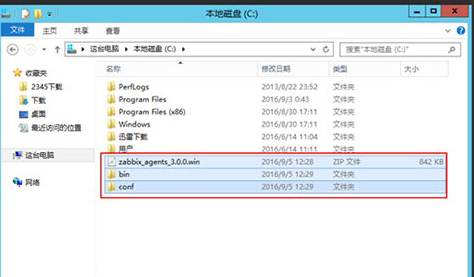
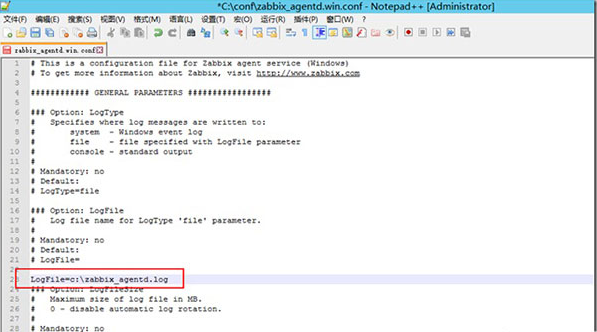
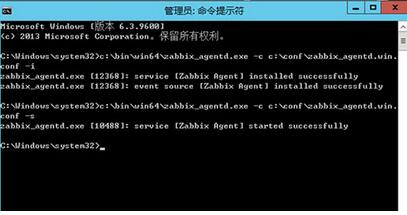
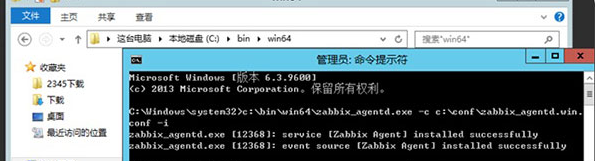
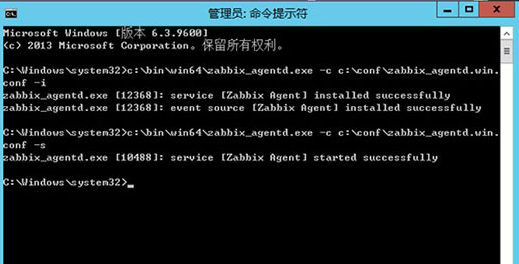
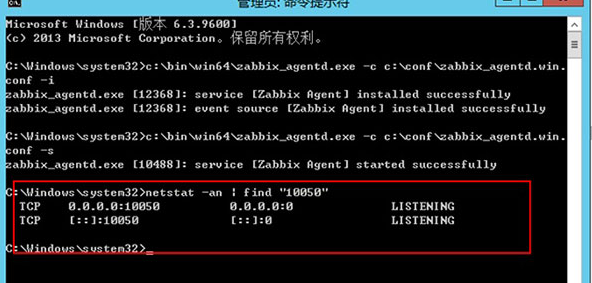
Zabbix开源系统监控工具官方电脑端使用方法


软件图集

提示:软件图集是通过Zabbix开源系统监控工具官网或软件客户端截图获取,主要用于分享软件价值,如有侵权请联系我们!
相关专题


最新软件
-
查看下载
 迅雷影音 视频播放 | 2026-07-16 天极下载站提供迅雷影音官方最新版免费下载。迅雷影音播放器官方版是迅雷官方出品的影音播放工具,原身迅雷看看播放器,拥有海量的视频资源,画质高清流畅,一直以来都深受广大朋友们的喜爱,迅雷影音播放器在迅雷看看的基础上又介入了许多新的功能,主要是体现在界面的优化,与交互设计的人性化上。视觉性能双重提升,百种格式,超清流畅播放,打造您的专属影音宝库!喜欢迅雷影音的家人们快来天极下载站体验,此软件已通过安全检测,无捆绑!
 -
查看下载
 全能翻译官 翻译软件 | 2026-07-16 全能翻译官是一款即时在线自动翻译器,支持在线翻译英语、日语、韩语、粤语、文言文等多种语言,并提供文档翻译、PDF翻译、图片翻译等翻译工具。全能翻译官,支持100+外语、民族语言互译,AI智能引擎翻译更准确,支持文字、文档、图片、视频、音频等多形式在线翻译,配有更多PDF、Word等文档处理工具。
 -
查看下载
 CAD快速画图 CAD | 2026-07-16 CAD快速画图是一款极简风格的CAD制图软件,给你与众不同的极致体验,极简极快,支持超高分辨率、超高清、超大屏,精准测量,打印转PDF,支持超高分辨率、超高清、超大屏,小巧易用、功能强大~
 -
查看下载
 鲁大师 硬件工具 | 2026-07-16 天极下载站提供鲁大师官方最新版免费下载。鲁大师是一款专业而易用并且完全免费的电脑硬件检测工具,通过跑分让用户直观地了解自己的电脑配置。鲁大师能监控用户的计算机硬件状态,了解电脑健康状况,避免硬件高温过热让计算机出现故障;同时能够分辨出用户计算机系统运行产生的垃圾文件并进行清理,全方位提升电脑性能。鲁大师拥有硬件检测、硬件测试、系统优化、节能降温、驱动安装、驱动升级、电脑检测、性能测试、实时温度检测、电池保护、电脑保护、驱动升级、手机评测等功能,感兴趣的话,可直接下载!喜欢鲁大师的家人们快来天极下载站体验,此软件已通过安全检测,无捆绑!
 -
查看下载
 Windows优化大师 系统优化 | 2026-07-16 天极下载站提供Windows优化大师官方最新版免费下载。Windows优化大师是一款轻量而强大的系统优化工具,30兆集成了能想到的PC优化功能。系统优化:电脑一键优化加速_电脑问题检测,C盘/全盘清理瘦身,磁盘碎片清理,浏览器缓存清理。系统保护:系统一键全面保护_流氓软件防护,卸载残留清理,流氓弹窗拦截,上网隐私痕迹清理。喜欢Windows优化大师的家人们快来天极下载站体验,此软件已通过安全检测,无捆绑!
 -
查看下载
 海鹦OfficeAI助手 办公工具 | 2026-07-16 海鹦OfficeAI助手是一款提升50%办公效率的智能助手软件,适合使用Microsoft Office 和 WPS Office 办公的用户,提供与 Office Copilot类似的功能和使用体验。无论你是在寻找如何输入“打勾(√)符号”的方法,还是想知道“怎么在插入表格前添加文字”,或者“该用哪个公式”, AI办公助手都能为你提供快速、准确的解决方案。 通过简单的指令,ExcelAI 插件可以帮你自动完成复杂的公式计算、函数选择。 WordAI 插件还具备整理周报、撰写会议纪要、总结内容、以及文案润色的强大功能。 总之,OfficeAI 助手将大大提升你的办公效率,让日常工作变得更加轻松便捷。
猜你喜欢
-

MTzone桌面计算器
427 KB/2024-02-19
查看下载 -

中国气象局官方气象桌面软件Weather Desktop
3.89MB/2023-04-11
查看下载 -

单位换算器
112KB/2024-03-07
查看下载 -

StartupStar 2.5e
1.57MB/2023-01-31
查看下载 -

谷歌浏览器猫抓插件
96.55KB/2023-08-07
查看下载


热门推荐