

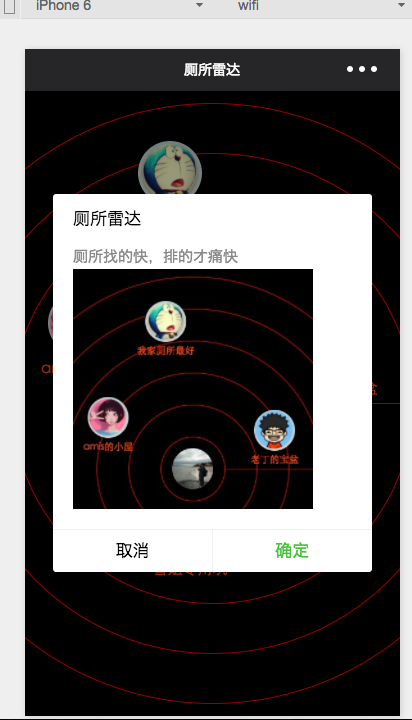
今天小编和大家一起学习的是如何在微信小程序中实现厕所雷达?一定有许多朋友很是期待吧,下面就是详细的内容。
下面直接上图:


js:
//index.js
var app = getApp()
var winHeight = 0
var winWidth = 0
Page({
data: {
//背景图片,现在没有
img:\'/pages/image/123.png\',
//确定左边距距离,上边距距离,厕所title,头像dataArr:[{\'left\':200,\'top\':100,\'title\':\'我家厕所最好\',\'img\':\'/pages/image/1.png\'},{\'left\':20,\'top\':400,\'title\':\'amis的小屋\',\'img\':\'/pages/image/2.png\'},{\'left\':540,\'top\':440,\'title\':\'老丁的宝盆\',\'img\':\'/pages/image/3.png\'},{\'left\':240,\'top\':800,\'title\':\'雪姐专用坑\',\'img\':\'/pages/image/4.png\'}]
},
//进页面后获取数据
onLoad: function () {
console.log(\'onLoad\')
var that = this
//调用应用实例的方法获取全局数据
app.getUserInfo(function(userInfo){
console.log(userInfo)
//更新数据
that.setData({
userInfo:userInfo
})
})
//获取数据
wx.getSystemInfo({
success: function(res) {
console.log(res)
winHeight = res.windowHeight;
winWidth = res.windowWidth;
}
})
// 使用 wx.createContext 获取绘图上下文 contextvar context = wx.createContext()
context.arc(winWidth/2, winHeight/2, 50, 0, 2 * Math.PI, true)context.arc(winWidth/2, winHeight/2, 100, 0, 2 * Math.PI, true)context.arc(winWidth/2, winHeight/2, 150, 0, 2 * Math.PI, true)context.arc(winWidth/2, winHeight/2, 200, 0, 2 * Math.PI, true)context.arc(winWidth/2, winHeight/2, 250, 0, 2 * Math.PI, true)context.arc(winWidth/2, winHeight/2, 300, 0, 2 * Math.PI, true)context.setStrokeStyle(\'red\')
context.setLineWidth(1)
context.stroke()
// 调用 wx.drawCanvas,通过 canvasId 指定在哪张画布上绘制,通过 actions 指定绘制行为wx.drawCanvas({
canvasId: \'radar\',
actions: context.getActions() // 获取绘图动作数组})
},
onShareAppMessage: function() {
// 用户点击右上角分享
return {
title: \'厕所雷达\', // 分享标题
desc: \'厕所找的快,排的才痛快\', // 分享描述path: \'path\' // 分享路径
}
}
})
wxml:
<!--index.wxml-->
<canvas canvas-id="radar">
<image class="userinfo" src="{{userInfo.avatarUrl}}"></image>
<block wx:for="{{dataArr}}">
<navigator url="../logs/logs?title={{item.title}}&img={{item.img}}">
<view class="toiletView" style="left:{{item.left}}rpx;top:{{item.top}}rpx" bindtap="toiletDetails" id="{{index}}">
<image class="toiletView-image" src="{{item.img}}"></image>
<text class="toiletView-text">{{item.title}}</text>
</view>
</navigator>
</block>
</canvas>
wxss:
/**index.wxss**/
page{
background: black;
height: 100%;
}
canvas{
width: 100%;
height: 100%;
}
.userinfo {
position:absolute;
top: 561rpx;
left:311rpx;
width: 128rpx;
height: 128rpx;
border-radius: 50%;
}
.toiletView{
position:absolute;
width: 180rpx;
height: 180rpx;
}
.toiletView-image{
position:absolute;
left: 13px;
top: 0px;
width: 128rpx;
height: 128rpx;
border-radius: 50%;
}
.toiletView-text{
position:absolute;
bottom: 10rpx;
font-size: 30rpx;
color: orangered;
width: 180rpx;
text-align: center;
}
以上就是如何在微信小程序中实现厕所雷达的全部内容了,大家都学会了吗?


")
")


语音转文字!新媒体翻译者都有哪些实时语音转文本工具?")


